Wednesday 31 July 2013

Tiramisu

Week 6 of July Recipe A Week Challenge - Dessert


Making Tiramisu really goes against my entire philosophy on coffee.  I don't like the stuff.  The look on my face gave me away if you saw that first!! Haha.  Hot, volcanic, bitter brown lava that leaves nothing to desire (except a breath mint!).  Maybe it will come with age, an acquired taste.  But for now, my immature taste buds will not be tortured with the taste that is coffee. 

So... unless you haven't guessed by now, I'm a tea drinker through and through.  I drink it any time of the day, any weather, any flavour, any brand, in any form: tea cup, a mug, from a teapot, from a diffusser, once through a straw, tea bag, loose tea leaves... anything goes :)

So why make the Tiramisu do you ask?  I have endured enough sideways glances at restaurants when a dodgy looking Tiramisu arrives and relentless offers to 'just taste it' if a good one comes along.  Yeeees... Mr Smoothy... This is your recipe! And not the maple kind... And you know what's in there... And I wont eat it or give it to the cat!

Besides actually pulling off the recipe and presenting a dessert that looked brilliaint, the Sunday we sat and ate this dessert was just beautiful!  Despite being winter, the sun was out in all its radiance and the temperature was just right.  Mom did a great job at setting the scene with her flowers and the table.

Going to miss sitting outside on the patio!  Going to miss you guys too!


Ingredients (serves 10-12):

I halved this recipe - and it still made PLENTY
750ml  fresh cream
6 egg yolks
3/4 cup caster sugar
1/2 cup espresso (we used Nespresso pods)
1/2tsp vanilla extract

2 cups espresso
1/2 cup rum (or other alcohol of your choice)
+- 800g finger biscuits (you might not use all of it)

3tbsn cocoa powder

Instructions:

In a large bowl, whip the fresh cream until quite stiff peaks form.
In a separate bowl, whisk the egg yolks and sugar until the mixture becomes light and creamy. Add the espresso and the vanilla and whisk for another minute.
Transfer the egg mixture to the whipped cream whilst whisking and make sure that everything is well combined.
Mix the espresso with the rum in a wide bowl and soak the biscuits very quickly in the mixture before placing them in a suitable dish.
Pour a layer of the cream mixture over the layer of biscuits and then repeat the process. Be sure to finish off with a cream layer.
Place in the refrigerator until the cream mixture is set.
When you are ready to serve, dust the Tiramisu with the cocoa powder and serve.


Recipe from Simply Delicious Blog

July Recipe A Week Challenge courtesy of Claudz

Friday 26 July 2013

Potato, Rosmary and Pecorino Bread

Week 4 of July Recipe A Week Challenge - Baked Goods


So I'm going to cheat a bit this week on the July Recipe A Week Challenge... this week has been sooooo busy!  I have had no time to have a go at the Week 5 challenge - vegetarian!  

Luckily last week I made two of the recipe challenges and I must say this has saved my skin!  

This week is the Potato, Rosmary and Percorino Bread.  Oh my word this bread was the best bread I have ever made!!  Totally moreish and who cares about the carbs... I ate about half the loaf and loaded it with butter just as it came out the oven.  Smelty nom nom :)  

I couldn't find Pecorino cheese so I used Parmesan.  I think the Pecorino would be better as Parmesan is quite a bit stronger.


Ingredients (makes 2 loaves):

I cup cooked potatoes (cook with 2 sprigs of rosemary and reserve 1 cup of cooking water), cooled to room temperature
2 x 10g sachets yeast
1 teaspoon sugar
½ cup butter, melted
¼ cup olive oil
3 tablespoons sugar
2 eggs
2 teaspoons salt
1 tablespoon freshly chopped rosemary
2 cups finely grated Pecorino
6-7 cups flour


Instructions:

Combine the reserved cooking water (from the potatoes) with the yeast and 1 teaspoon sugar, mix and allow to stand for 5 minutes until frothy.
In a separate bowl, combine the potatoes, butter, oil, sugar, eggs, salt, rosemary and Pecorino and mix well.
Add the egg mixture to the yeast mixture and mix well.
Add two cups of flour and mix until the dough is sticky then add the rest of the flour cup-by-cup until you have a soft dough.
Turn the dough out onto a floured surface and knead for 6-7 minutes until the dough is smooth.
Place in a floured bowl and cover with a damp cloth. Place in a warm spot and allow to rise for 45 mins – 1 hour.
Pre-heat the oven to 180°c.
After an hour, punch down the dough and divide in two round loaves. Cut a cross/square onto the top of the dough and place on a baking paper-lined baking sheet. (don't cut the cross too big otherwise your loaf will split into 4 while you cooking it!)
Place in the oven and allow to bake for 30-35 minutes until the loaf is golden brown, crusty and sounds hollow when tapped at the bottom.
Remove from the oven and allow to cool slightly before serving with butter.


Recipe from Simply Delicious Blog


Wednesday 17 July 2013

Coconut Panna Cotta

This recipe is backed by a (now) funny story.

When I first moved to Dundee, Scotland, I had no idea where to stay and what accommodation to look for.  After searching endlessly I finally decided to accept an en-suite double room in a large house with 5 or 6 others.  The fact that most tenants were foreign and the room was en-suite gave me comfort; I would be able to make friends with people in the same situation as me (all being expats) and I would be able to avoid any awkward bathroom moments.  There was the promise of internet, tv, a fully equipped kitchen and a furnished room.  It seemed like exactly what I needed.


Arrival in Dundee was... interesting.  Having arrived in London with my folks, jumped into a rented car, driven through the uk and observed its scenery, spent the night in Giggleswick, pressed on the next day to Dundee, and arrived at my new driveway, we were tired and cold.  We knew the land lady was not there and were greeted by a fellow tenant, Katie.  She walked us through the front garden, which was a collection of gardening and landscaping projects gone horribly wrong, passed the side of the house and garden lawn chair set that committed suicide years ago and purposely remained sprawled on the walkway as a constant reminder of its once happy existence, and around to the derelict back entrance of the house.

Before Katie let us in she gave a wee glance back at me with a slightly raised eyebrow, which I now know was her telling me you think that was bad?  Wait until we go inside!  The 5 meter long narrow yellow passageway leading to the centre of the house could only be described as an obstacle course.  As the door opened inward you were immediately confronted with 2 bicycles on the left, expertly balanced on one another such that if a fly landed on any handlebar the masterpiece would collapse.  Behind the bicycles stood a dilapidated bookcase packed with books spanning multiple centuries and genres, and no doubt a few books on Gardening For Dummies.
To the right of the passageway was an exhausted looking lawn mower that clearly gave up on the garden and still had grass in the grassbox, and got whacked in the side every time the door opened, followed by an ironically dusty vacuum cleaner whose worn out pipe curled into the passageway and presented the perfect opportunity for you to hook your foot into the loop and bring the whole passageway down like dominoes.  Behind the vacuum cleaner a long wooden table stretched out, surprisingly with nothing on it.  The floor was muddied and full of post and magazine subscriptions, which most likely used to sit on the empty table.  Encase you needed to check if your jaw had not completely detached from your face yet, a huge mirror confirmed your expression at the end of the passageway.

The passageway then took an unexpected sharp right-left turn and continued forward under a fairy light filled roof until you reached the central staircase.  Underneath the staircase lay numerous pairs of shoes and some lonely strays.  A cupboard lulled off the wall opposite the shoes with a note attached to the top draw: please leave your shoes in the draws!

A white natural light-filled staircase spiraled up from the mass of soggy shoes presenting the rest of the house.  A huge window at the foot of the staircase reaching up to the first landing, washing hanging on the balustrade (including socks and polka dot panties), a random brown velvet covered chair halfway up the staircase serving no purpose but to offer restful reward for climbing 10 steps, a piano crammed in the corner of the first level landing, purple walls filled with inconsistent skew artwork, passages on the first landing leading to the kitchen, 3 rooms and a bathroom, another staircase (also draped with washing) continuing to the third level and a further 3 rooms, a funny wire fish sculpture hanging from the ceiling light, and book shelf after book shelf filled with crap.

It was clear - this woman was a hoarder!  Thank the lord I was walking in front because if I saw my mother's face as we walked through the monstrosity I would have ran back out.  Katie showed me to my room: wooden flooring with pink fitted cupboards covering both sides of the room from top to bottom, one of them framing my double bed like an arch.  On closer inspection of the cupboards we found old underwear and clothes in a drawer left for me like charity.  Behind my bed a blue and white flower pattern wall paper broke the pink monotony.  Garish pink curtains hung from the roof with a blue roller blind behind hiding a huge bay window.  To the right through a door was a huge black and white tiled bathroom complete with shower, jacuzzi bath, weird gold mirror, toilet, basin, and heating rack mounted to the wall.  Again we found some old used toiletries waiting for me to claim - no thanks!


The 3 of us stood in my freezing pink room looking dumbstruck and speechless.  I was officially living in a loony bin with a land lady who I later learned was not only a serious hoarder, but an outspoken feminist, anti government, anti big corporation, insane chatter box sleeping and working out of the kitchen!  I don't know how I managed those 6 months but the only good thing (besides the jacuzzi bath) to come out of the asylum was the Coconut Panna Cotta recipe the land lady gave me just before I left.

Enjoy... if you dare hehe.

Ingredients (serves 4):


5 Gelatine Leaves
500ml Double Cream
400ml Tin Coconut Milk
75g Castor Sugar
500g Berry Mix (any assortment of fresh berries)
A couple tots of Vodka
4/6 tablespoons Castor Sugar


Instructions:


Put the gelatine leaves in a bowl, cover with cold water and leave to soak for 5-10 minutes.
Heat the double cream and coconut milk in a pan to just below boiling point. Add the sugar and whisk until dissolved.
Drain the gelatine leaves and squeeze out any excess water. Add to the hot cream and stir until completely dissolved. Divide the mixture between 4 - 6 ramekins, cool then cover loosely with clingfilm and chill overnight until set.
Coat your berries in the remaining sugar and a few tots of Vodka.  Stir well and allow to sit until the berries seep and produce a syrup.
Spoon the berry syrup over the panna cotta.

Note: If you don't want to serve the panna cotta in a ramekin, dip each ramekin into a bowl of hot water, loosen the edges and turn each panna cotta out onto a plate.

Monday 15 July 2013

Zucchini, Feta and Mint Quiche

Week 4 of July Recipe A Week Challenge - Baked Goods


To quote my dear friend Bez: GOOD LORD!  This recipe was absolutely delish and very easy to make.  I love quiche and the best one I have ever had is by Donna, and not the Aussie Donna, but the Irish Gypsy Donna (Scott's mum).  Her spinach and feta quiche is one for the gods.  I need to get my hands on the recipe - perhaps a trade is in order??

But this quiche is narrowly in the lead I'm afraid! However... *cue optimistic and glorious music score* with Donna's crust and this filling we have an absolutely, positively, most definitely, undeniably, mouth watering, jaw dropping, foodgasmic quiche!


I would not change a thing with this, except that I would have eaten more of it!  Eat it freshly out the oven, but allow time to cool!! I learn this the hard way EVERY TIME burning my palate to a thin membrane in my eagerness to devour food.


Ingredients (makes 1 large quiche):

  • 1 roll, ready-made shortcrust pastry. (I couldn't find any so I used the Woolies shortcrust pastry mix. So simple just add water!)
  • 1 large onion, finely chopped
  • 2 cloves garlic, crushed
  • 700g fresh zucchini, grated
  • handful fresh mint, finely chopped
  • 3 rounds of Feta cheese
  • 4 large eggs
  • 250ml cream / milk
  • salt & pepper to taste


Instructions:

Roll out the shortcrust pastry to fit into the quiche dish. 
Pre-heat the oven to 180°c and Blind Bake the pastry for 10 minutes until golden brown. Set aside.
In a large pan, fry the onion and garlic until soft and translucent. Add the grated zucchini and fry for 2-3 minutes until slightly softened. Transfer the mixture into a colander and allow to drain for 5 minutes. Add the chopped mint.
Beat together the eggs, milk and seasoning.
Spoon the zucchini mixture on top of the pastry and cover with the egg mixture. Crumble over the Feta cheese and grind over some black pepper.
Bake for 20-25 minutes until the quiche is set but still slightly soft in the middle.  Extra cooking time may be necessary, but don't fret this is ok.
Remove from the oven and allow to cool to room temperature.


Recipe from Simply Delicious Blog


July Recipe A Week Challenge courtesy of Claudz


Tuesday 9 July 2013

Linguini with Anchovies, Garlic, Lemon and Chilli

Week 3 of July Recipe A Week Challenge - PASTA


If you are looking for something quick, easy and yummy to whip up - this is your answer.


I'm not a fan of anchovy, therefore I chose this recipe in an attempt to change my mind.  Did it work?? No... just kidding!! It was surprisingly yum and full of conflicting flavours that ultimately pulled together quite well. The extreme salt from the anchovy was counterbalanced by the extreme sour and tang of the fresh lemon juice.  Genius!  I ran out of fresh pecorino, but I imagine with this shaved on top we have a winner.

Ingredients: (Serves 4)

500g Linguini
4 tbsp olive oil
2 garlic cloves, finely sliced
6 Mediterranean Delicacies anchovy fillets
1/2 cup fresh parsley, finely chopped
1-2 chillies, finely chopped
juice of 1 lemon
salt & pepper to taste
fresh pecorino to serve

Instructions:

In a large pot of salted, boiling water, cook the pasta until al dente.
In the meanwhile, heat the olive oil in a frying pan and fry the garlic and anchovies for a minute before adding the parsley, chillies and lemon juice.
Turn off the heat.
Reserve 2 cups of the pastas cooking water and toss the drained pasta with the anchovy sauce.
Add some of the reserved cooking water and stir to coat the pasta. If the pasta seems dry, add more of the cooking liquid.
Season to taste and serve with freshly grated pecorino and parsely.

Tip: serve this with some crusty bread or perhaps some herbed bread crumbs. Using fresh breadcrumbs, fry them in a little bit of olive oil with a garlic clove and finely chopped herbs until they turn golden brown. The crunch will be great with the al dente pasta. 


Recipe from Simply Delicious Blog
July Recipe A Week Challenge courtesy of Claudz


Sunday 7 July 2013

Bollywood Cooking

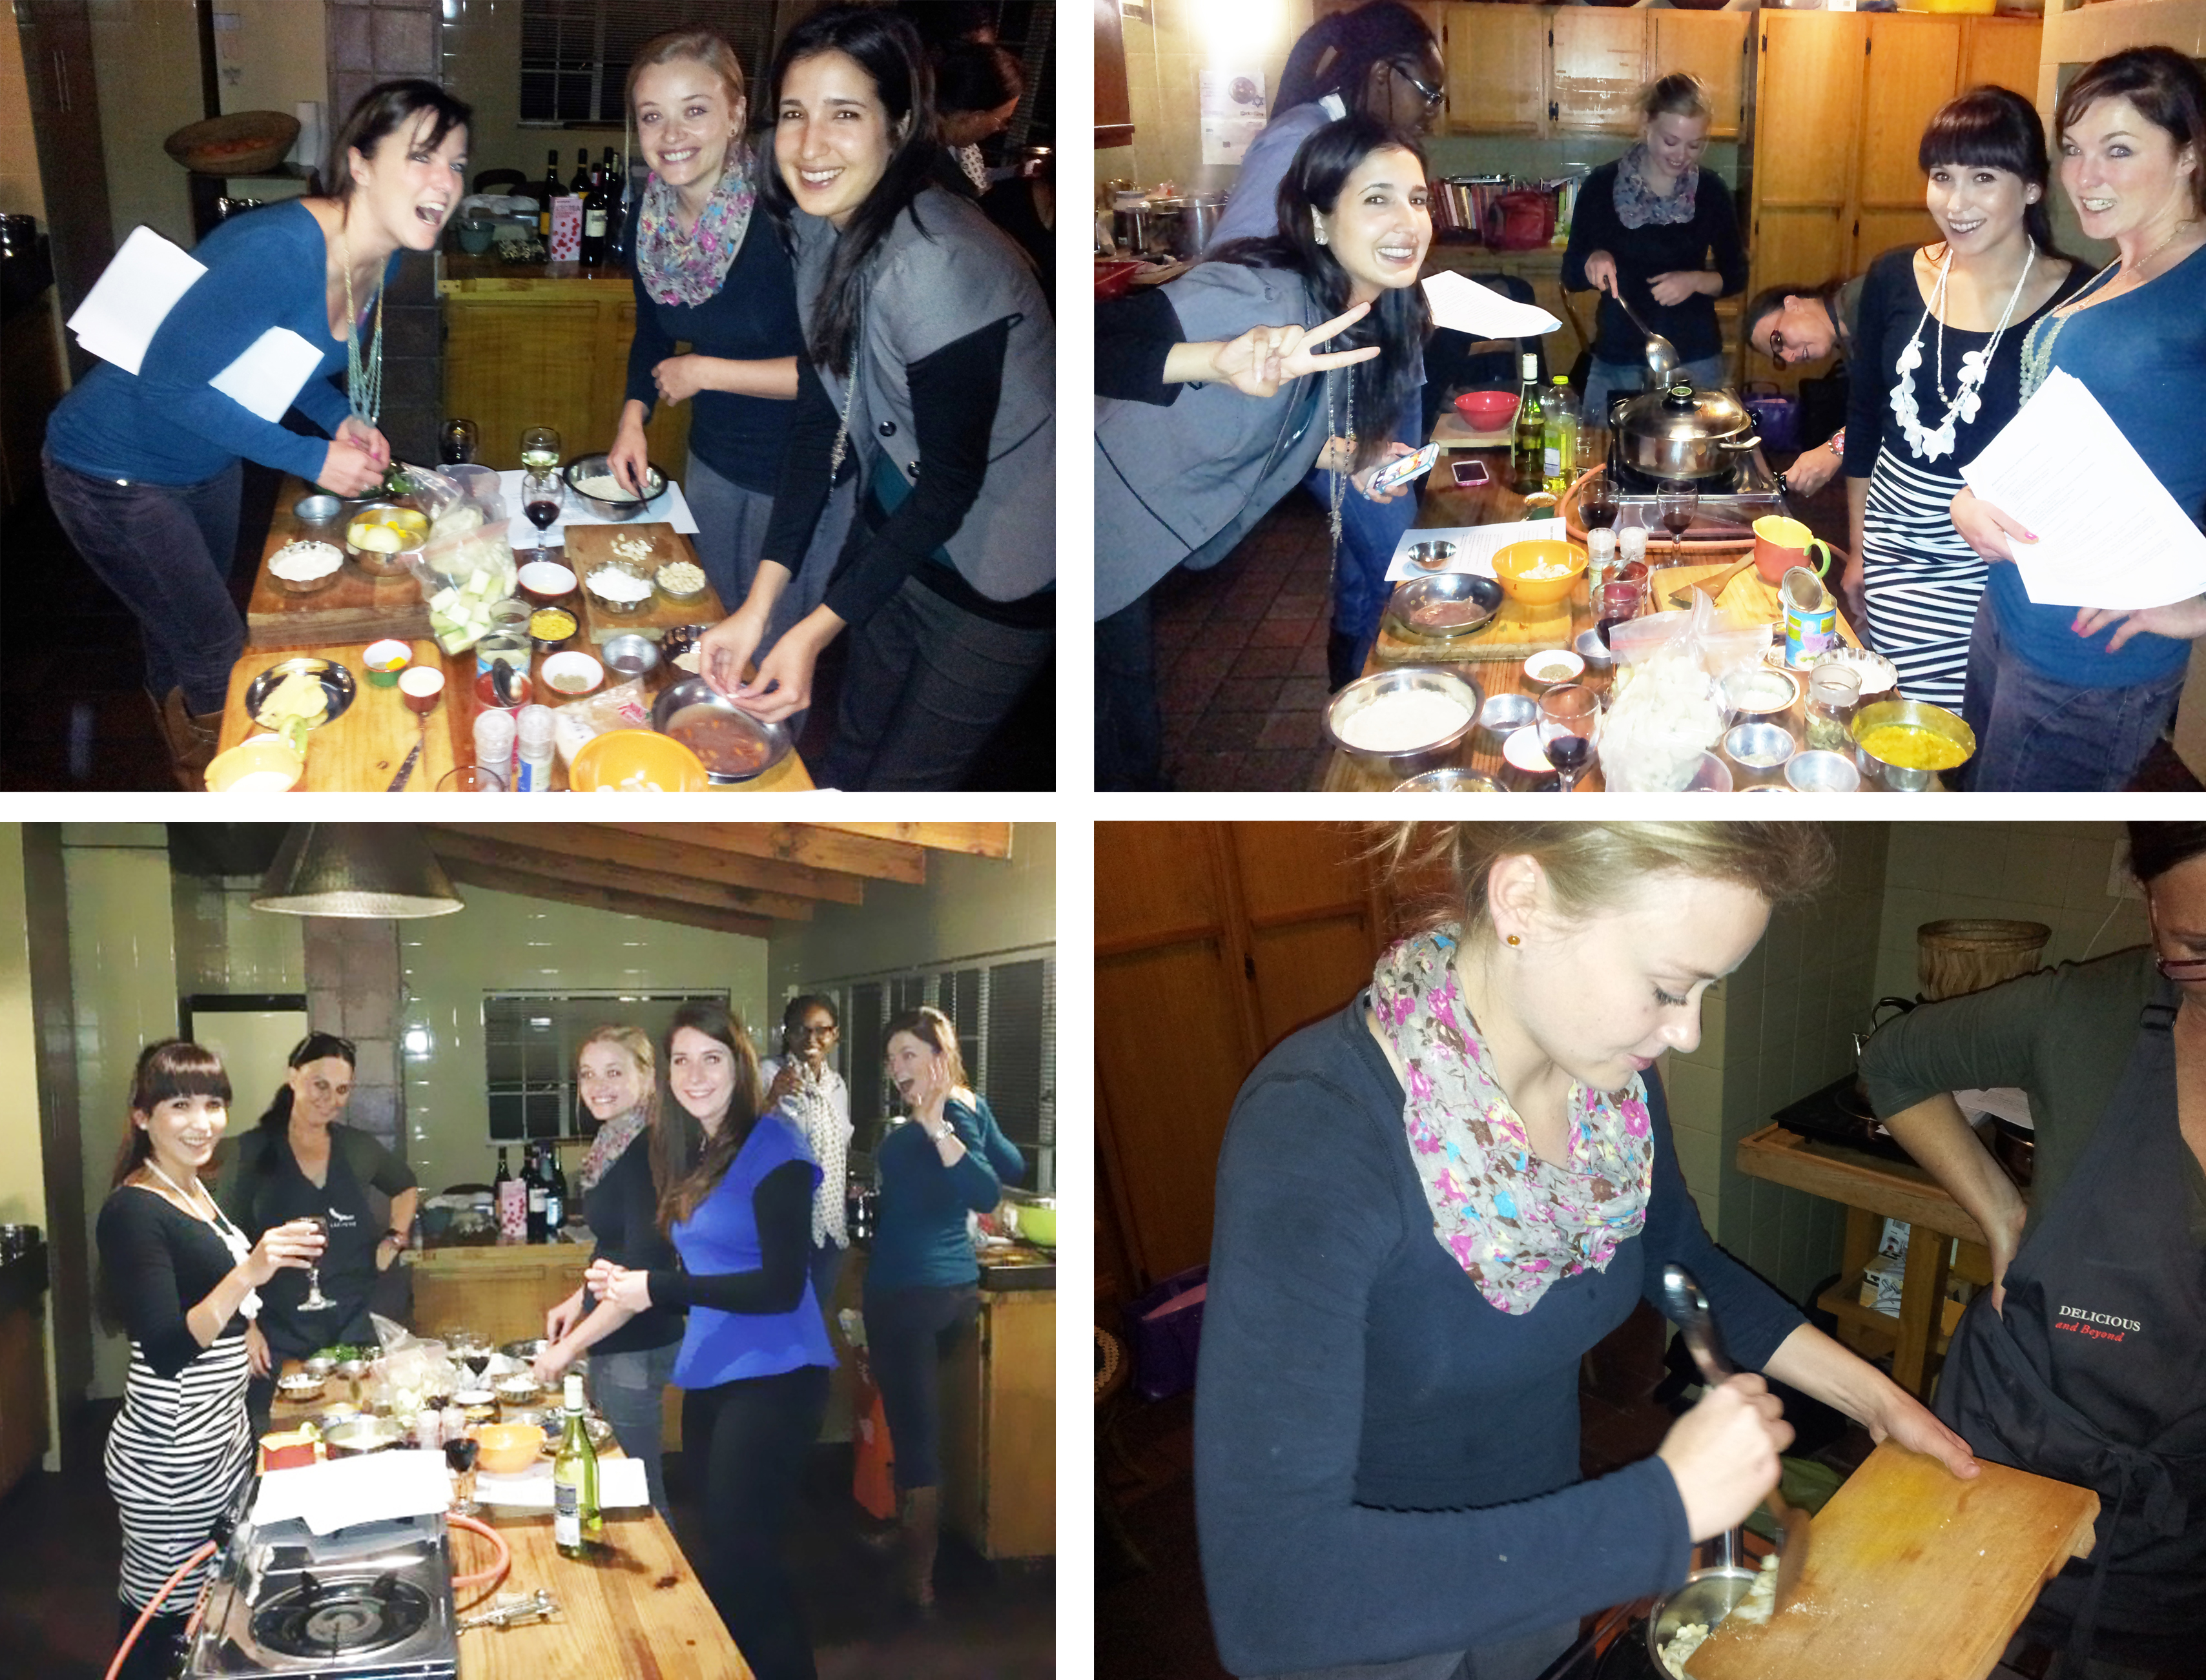
I have been dying to do a cooking class and can finally scratch this one off my bucket list - and what a cooking class it was! Six of us ladies booked in for a 5 course Indian Bollywood themed cooking class. Instructed by an excellent teacher, Alexis, we were taken on a journey through India: culture, colours, symbolisms, spirituality, exploring the senses, cooking techniques, food, the meaning of the right and left hand (left is for ablution only and the right everything else) and the art of eating with our hands.

Alexis opened us up to her life and her experiences which helped make our journey even more important. Gathered in a large but quaint kitchen we discussed the menu for the evening: Green Chutney, Paneer Makhani (Paneer is a type of cheese which we actually made on the night! It was FANTASTIC), Pistachio Korma with Cauliflower and Calabash (Calabash is a veggie from the squash family, very nice I thoroughly enjoyed it), Coconut and Cashew Rice, and an Almond Fudge with Chocolate Truffles from the night before.  Recipes to follow when I try make them at home again :)

Let the cooking begin! Preparations

With wine at the ready and all the recipes split among ourselves, we embarked on our cooking journey. I could not contain my excitement... I felt like one of those idiots with a stupid grin plastered on my face!

Me, Kirst, Ruvi
Me, Bez (very proud of her Chutney) and Kirst

We watched each other and assisted where necessary, learning and observing. The main rule with Indian cooking is NEVER taste the food while cooking. (Bez, bless her, arrived late and missed the rule. She eagerly gobbled down a cashew nut from the table while the 5 of us just gasped and stared at Alexis waiting for the wrath of India to come down on Bez. Luckily Bez was oblivious to the rule and apologised repeatedly, no wrath or bad karma went her way).

Delightful smells and noises engulfed the kitchen as we started enjoying ourselves more and more. A couple of hours later we were ready to serve and indulge. Alexis set the table with large silver dishes/plates and smaller pots or cups, used to serve up your curry or rice or chutney. We all eagerly plated up like starving fools and received our first lesson on eating Indian food with our hands - well right hand to be exact! I failed dismally - rice falling everywhere, sauce falling on my chin, and unattractively stuffing my fingers into my mouth. Defeated I used my fork for the rest of the meal.

The food was AMAZING! Such fresh and strong flavours.. absolutely delicious!! Vivid colouring and smells, exactly how food should be.

Table set and ready to eat!
Ruvi, Tiff, Kirst, Me, Bez
Beautiful
bez, Mandy, Kirst, Me, Tiff, Ruvi
Pot bellied, wine soaked and recipes at hand, we gratefully thanked Alexis for her efforts and fantastic experience and headed our separate ways. All I could think about on the drive home was when can I make all this again!!


Thursday 4 July 2013

One Pot Steamed Fish


Week 2 of the July recipe challenge: Fish


In light of the fact that this week's July Recipe A Week Challenge was cooked by my mom in magic Malta, I need to post a fantastic fish recipe.  I have made this recipe countless times and it never fails. This recipe is dedicated to Marijka, who has been begging me for this recipe for ages!  I'm sorry it has taken so long to get this to you.  I hope its as delicious as the first time I made it for you.


My first "official" cook book was this one: fast, fresh, simple. by Donna Hay, given to me by aunt Helen.  This woman is my food icon - I love her!  The fact that my aunt loved her too is even more reason I cook so many of her dishes.  


As you have probably guessed, this is a Donna Hay recipe that I have adapted for fish instead of chicken. 

Enjoy!

Ingredients: (Serves 4)

4 portions of white fleshy fish (sea bass is brilliant)
1 cup Jasmine rice
2 cups of chicken/fish stock
3/4 garlic cloves, finely chopped
A good stick of fresh Ginger, roughtly sliced
5/6 spring onion sprigs, sliced longitudinally
1 yellow pepper, roughly sliced
Handful of coriander
Salt and pepper
1 tsp Chilli flakes (optional)

Instructions:

Add some olive oil to a large pan or pot with a lid.  
Fry until slightly golden the garlic, ginger, spring onion, pepper and chilli flakes (optional).  
Turn the heat down to a simmer.
Add the dry rice to the pan and swoosh around to combine with the ingredients.  Spread the rice evenly across the pan.
Add the stock slowly so not to disturb the rice.
Cover and let simmer for 8-10 minutes.
Remove the lid and gently place the fish portions on top of the rice. Crack some salt and pepper over the fish.
Cover and cook for 8-10 minutes.
Scoop the fish portions out with a big spoon, making sure you get the rice underneath.  Plate up with a sprinkling of coriander to finish.

Tip: Check the fish every now and then to make sure you don't over cook it or check there is still a bit of moisture in the pan.  If it looks a bit dry and your fish is not cooked yet, just add a wee bit more water.


Tuesday 2 July 2013

Pan-Fried Seabass in Lemon Sauce


Week 2 of the July recipe challenge: Fish


Fish is probably the most understated and unliked of all the 'meat'.  People are either too nervous to try fish, they don't know how to cook it, they don't like the fishy taste or its too bland, they don't like bones, or the most common one they don't like the smell (sometimes I admit its pretty disgusting - when its raw).

My parents have a lovely apartment in Malta over looking a small bay (I know I'm jealous too).  When this recipe challenge came up I told my mom about it and within 1 day she had already asked if she can cook the fish.  Being in Malta the fish is INCREDIBLE.  Fresh fresh fresh!  So I had no choice but to relinquish the fish challenge to my mom because it's honestly the best place to be cooking fish.

Note: I will post another fish recipe later this week.  The recipe is one that I love and is sooooo simple!  
Marijka, your senses should be tingling as you may be getting a surprise this week :)

Back to the recipe challenge.  In the words of my co-chef and food inspiration, Mom.

"Ok firstly we bought FRESH sea bass so that is of course key... However the sauce was extremely light and fragrant (lemon) that this could definitely enhance any fresh fish.
I seasoned the fish with my trusty fish spice [this fish spice is a Maltese spice, but apparently the Woolies fish spice is fantastic as well] and then simply fried it for a very few minutes on each side, skin side down first to sealed in flavour!  I heated the sauce in small pot and put the sauce over the fish, added capers and parsley before serving with salad.

That is it !!!"

Mom standing on the apartment balcony


This is my Mom in the Malta apartment... living the dream! And eating all the fish.  Thanks for all your inspiration and nudging in the kitchen when I was young.  If it wasn't for you I would not be so passionate and excited about cooking.

Mom walking the Ta'Xbiex Waterfront

Ingredients: (Serves 4)

Lemon-cream sauce
1 cup cream
juice and zest of 2 lemons
2 garlic cloves, minced
salt & pepper to taste
Fish
4 fish fillets (I used fresh hake)
¾ cup flour
1 teaspoon salt
2 teaspoons seasoning spice of your choice (I used a fish spice)
To serve
capers
parsely

Instructions:

To make the sauce, combine all the ingredients in a small saucepan and allow to simmer for 10 minutes until reduced slightly.
For the fish, combine the flour, salt & seasoning spice and coat the fish fillets thoroughly.
Fry the fish in a hot pan (in a little vegetable oil, skin-side down first) until golden brown then carefully flip over and fry for another 4-5 minutes until the fish is cooked through and golden brown.

Recipe from Simply Delicious Blog