Monday, 15 July 2013

Zucchini, Feta and Mint Quiche

Week 4 of July Recipe A Week Challenge - Baked Goods


To quote my dear friend Bez: GOOD LORD!  This recipe was absolutely delish and very easy to make.  I love quiche and the best one I have ever had is by Donna, and not the Aussie Donna, but the Irish Gypsy Donna (Scott's mum).  Her spinach and feta quiche is one for the gods.  I need to get my hands on the recipe - perhaps a trade is in order??

But this quiche is narrowly in the lead I'm afraid! However... *cue optimistic and glorious music score* with Donna's crust and this filling we have an absolutely, positively, most definitely, undeniably, mouth watering, jaw dropping, foodgasmic quiche!


I would not change a thing with this, except that I would have eaten more of it!  Eat it freshly out the oven, but allow time to cool!! I learn this the hard way EVERY TIME burning my palate to a thin membrane in my eagerness to devour food.


Ingredients (makes 1 large quiche):

  • 1 roll, ready-made shortcrust pastry. (I couldn't find any so I used the Woolies shortcrust pastry mix. So simple just add water!)
  • 1 large onion, finely chopped
  • 2 cloves garlic, crushed
  • 700g fresh zucchini, grated
  • handful fresh mint, finely chopped
  • 3 rounds of Feta cheese
  • 4 large eggs
  • 250ml cream / milk
  • salt & pepper to taste


Instructions:

Roll out the shortcrust pastry to fit into the quiche dish. 
Pre-heat the oven to 180°c and Blind Bake the pastry for 10 minutes until golden brown. Set aside.
In a large pan, fry the onion and garlic until soft and translucent. Add the grated zucchini and fry for 2-3 minutes until slightly softened. Transfer the mixture into a colander and allow to drain for 5 minutes. Add the chopped mint.
Beat together the eggs, milk and seasoning.
Spoon the zucchini mixture on top of the pastry and cover with the egg mixture. Crumble over the Feta cheese and grind over some black pepper.
Bake for 20-25 minutes until the quiche is set but still slightly soft in the middle.  Extra cooking time may be necessary, but don't fret this is ok.
Remove from the oven and allow to cool to room temperature.


Recipe from Simply Delicious Blog


July Recipe A Week Challenge courtesy of Claudz


Tuesday, 9 July 2013

Linguini with Anchovies, Garlic, Lemon and Chilli

Week 3 of July Recipe A Week Challenge - PASTA


If you are looking for something quick, easy and yummy to whip up - this is your answer.


I'm not a fan of anchovy, therefore I chose this recipe in an attempt to change my mind.  Did it work?? No... just kidding!! It was surprisingly yum and full of conflicting flavours that ultimately pulled together quite well. The extreme salt from the anchovy was counterbalanced by the extreme sour and tang of the fresh lemon juice.  Genius!  I ran out of fresh pecorino, but I imagine with this shaved on top we have a winner.

Ingredients: (Serves 4)

500g Linguini
4 tbsp olive oil
2 garlic cloves, finely sliced
6 Mediterranean Delicacies anchovy fillets
1/2 cup fresh parsley, finely chopped
1-2 chillies, finely chopped
juice of 1 lemon
salt & pepper to taste
fresh pecorino to serve

Instructions:

In a large pot of salted, boiling water, cook the pasta until al dente.
In the meanwhile, heat the olive oil in a frying pan and fry the garlic and anchovies for a minute before adding the parsley, chillies and lemon juice.
Turn off the heat.
Reserve 2 cups of the pastas cooking water and toss the drained pasta with the anchovy sauce.
Add some of the reserved cooking water and stir to coat the pasta. If the pasta seems dry, add more of the cooking liquid.
Season to taste and serve with freshly grated pecorino and parsely.

Tip: serve this with some crusty bread or perhaps some herbed bread crumbs. Using fresh breadcrumbs, fry them in a little bit of olive oil with a garlic clove and finely chopped herbs until they turn golden brown. The crunch will be great with the al dente pasta. 


Recipe from Simply Delicious Blog
July Recipe A Week Challenge courtesy of Claudz


Sunday, 7 July 2013

Bollywood Cooking

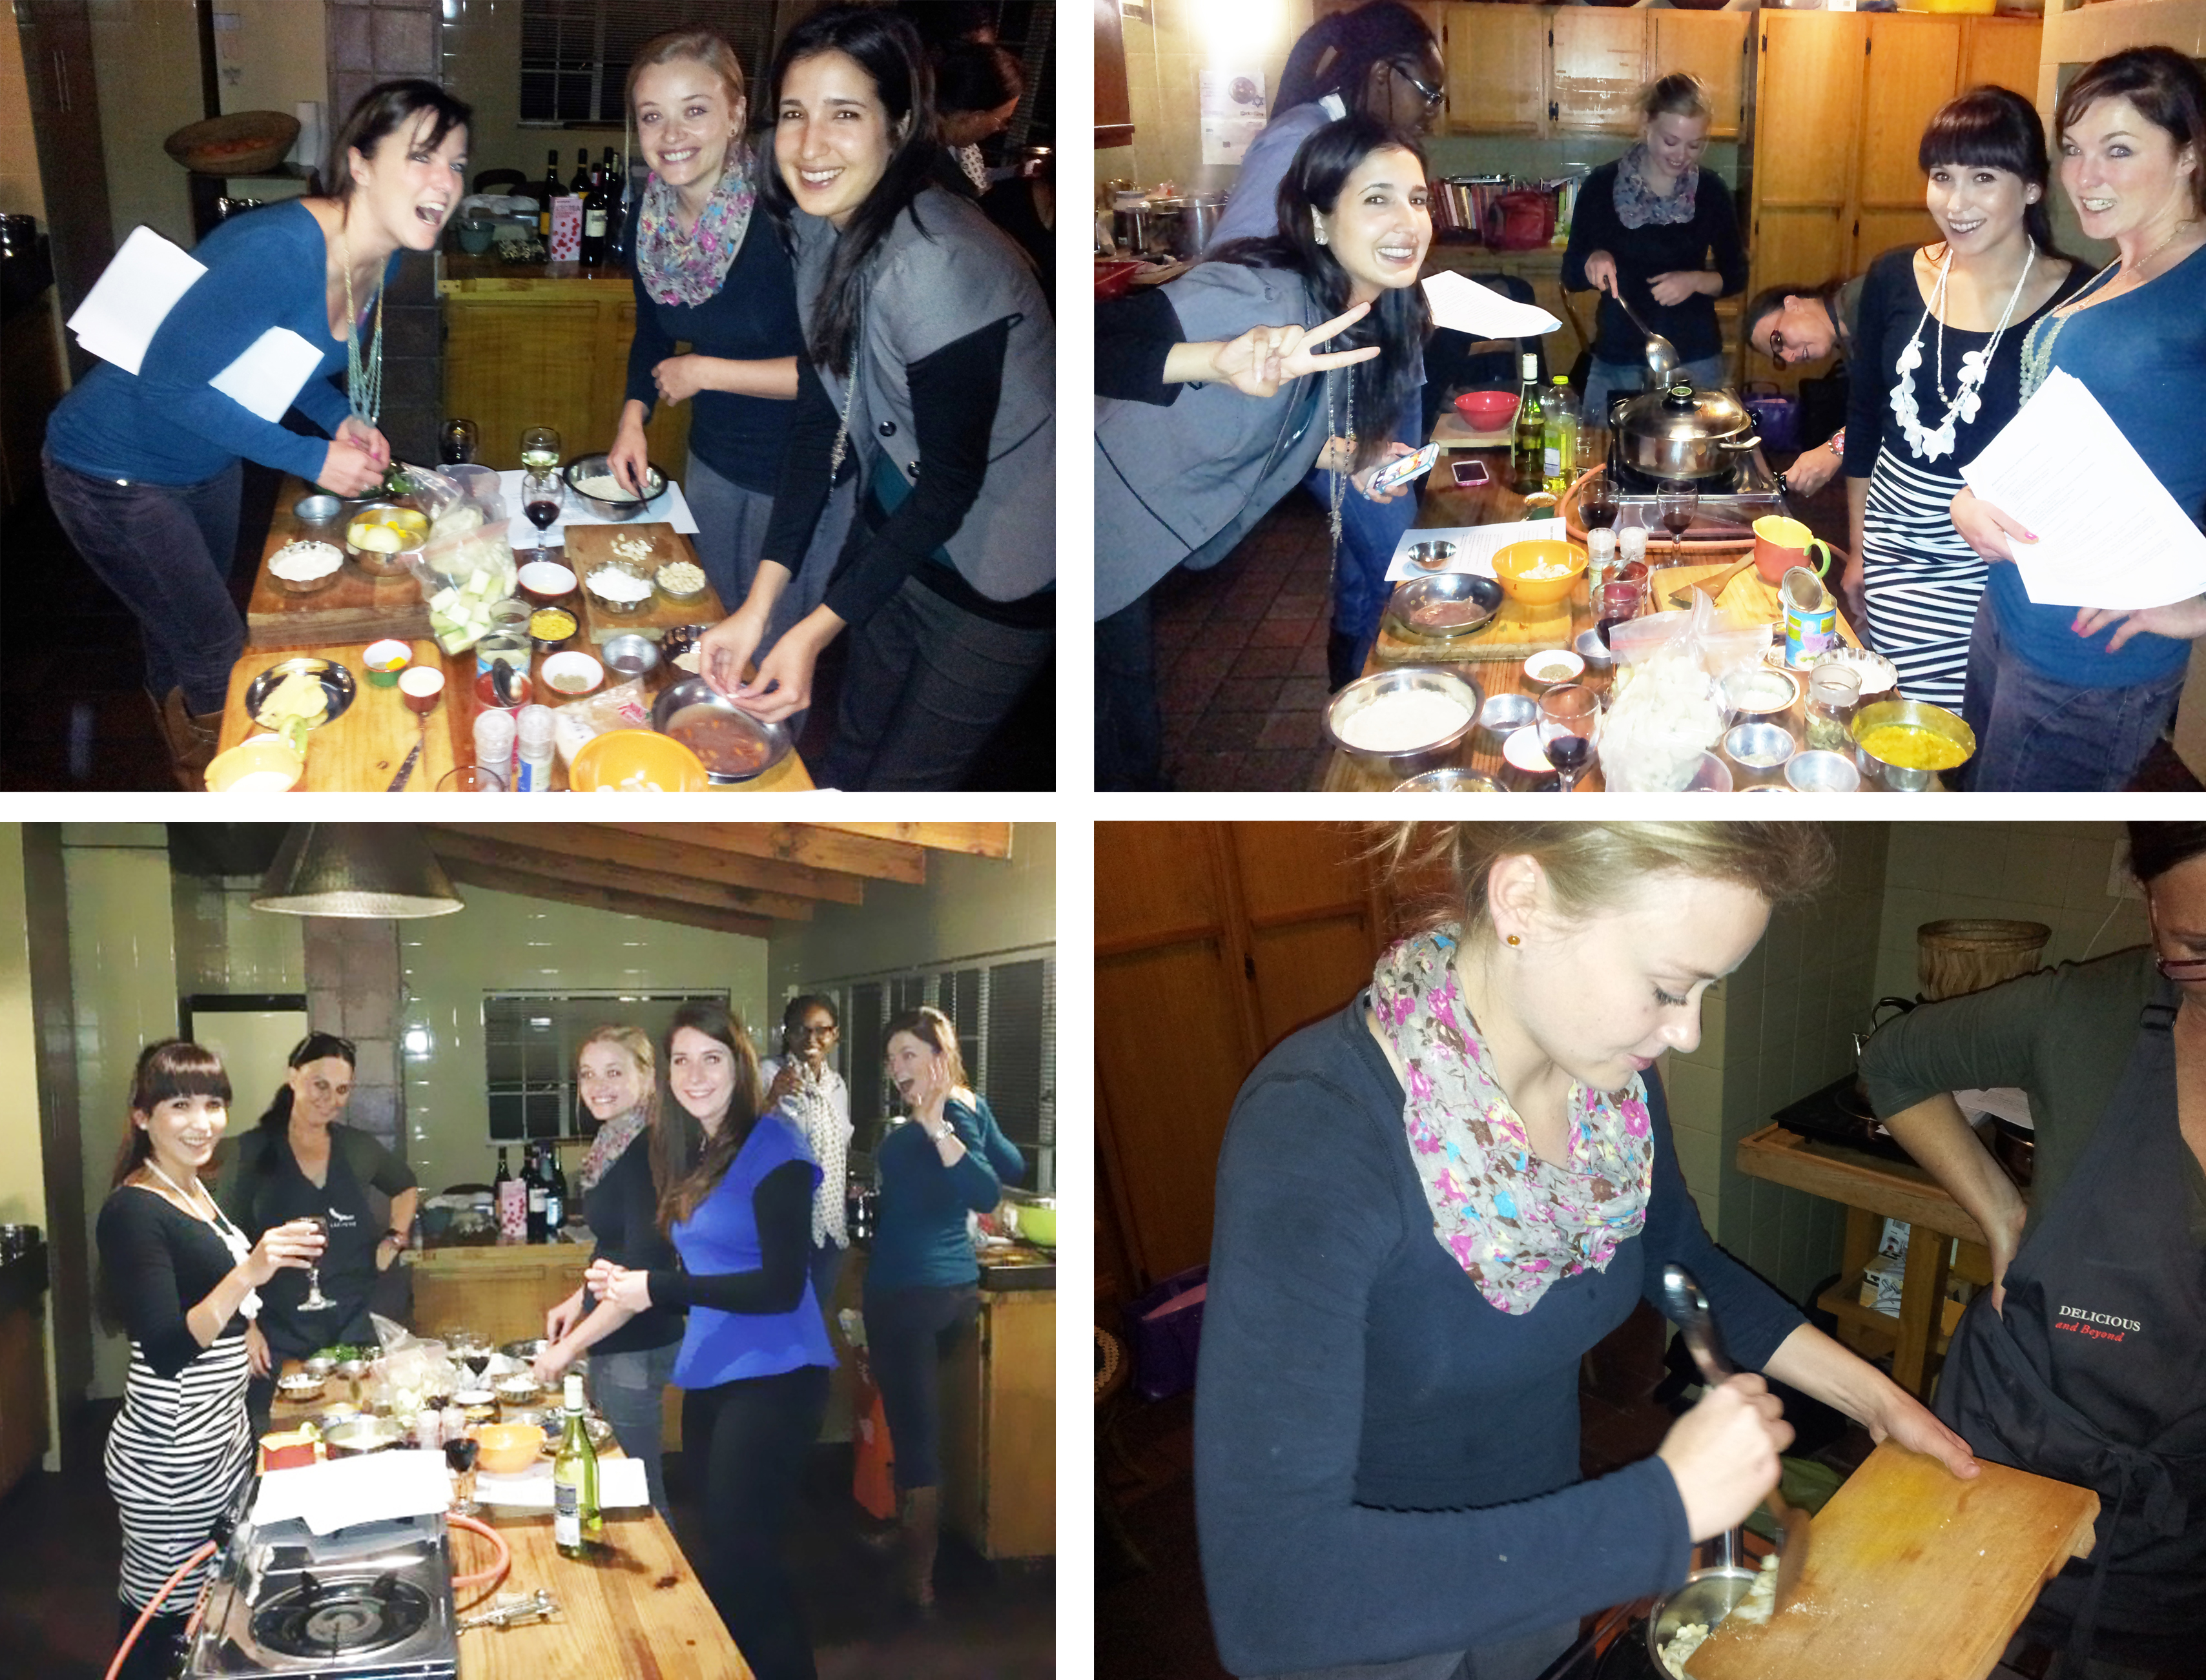
I have been dying to do a cooking class and can finally scratch this one off my bucket list - and what a cooking class it was! Six of us ladies booked in for a 5 course Indian Bollywood themed cooking class. Instructed by an excellent teacher, Alexis, we were taken on a journey through India: culture, colours, symbolisms, spirituality, exploring the senses, cooking techniques, food, the meaning of the right and left hand (left is for ablution only and the right everything else) and the art of eating with our hands.

Alexis opened us up to her life and her experiences which helped make our journey even more important. Gathered in a large but quaint kitchen we discussed the menu for the evening: Green Chutney, Paneer Makhani (Paneer is a type of cheese which we actually made on the night! It was FANTASTIC), Pistachio Korma with Cauliflower and Calabash (Calabash is a veggie from the squash family, very nice I thoroughly enjoyed it), Coconut and Cashew Rice, and an Almond Fudge with Chocolate Truffles from the night before.  Recipes to follow when I try make them at home again :)

Let the cooking begin! Preparations

With wine at the ready and all the recipes split among ourselves, we embarked on our cooking journey. I could not contain my excitement... I felt like one of those idiots with a stupid grin plastered on my face!

Me, Kirst, Ruvi
Me, Bez (very proud of her Chutney) and Kirst

We watched each other and assisted where necessary, learning and observing. The main rule with Indian cooking is NEVER taste the food while cooking. (Bez, bless her, arrived late and missed the rule. She eagerly gobbled down a cashew nut from the table while the 5 of us just gasped and stared at Alexis waiting for the wrath of India to come down on Bez. Luckily Bez was oblivious to the rule and apologised repeatedly, no wrath or bad karma went her way).

Delightful smells and noises engulfed the kitchen as we started enjoying ourselves more and more. A couple of hours later we were ready to serve and indulge. Alexis set the table with large silver dishes/plates and smaller pots or cups, used to serve up your curry or rice or chutney. We all eagerly plated up like starving fools and received our first lesson on eating Indian food with our hands - well right hand to be exact! I failed dismally - rice falling everywhere, sauce falling on my chin, and unattractively stuffing my fingers into my mouth. Defeated I used my fork for the rest of the meal.

The food was AMAZING! Such fresh and strong flavours.. absolutely delicious!! Vivid colouring and smells, exactly how food should be.

Table set and ready to eat!
Ruvi, Tiff, Kirst, Me, Bez
Beautiful
bez, Mandy, Kirst, Me, Tiff, Ruvi
Pot bellied, wine soaked and recipes at hand, we gratefully thanked Alexis for her efforts and fantastic experience and headed our separate ways. All I could think about on the drive home was when can I make all this again!!


Thursday, 4 July 2013

One Pot Steamed Fish


Week 2 of the July recipe challenge: Fish


In light of the fact that this week's July Recipe A Week Challenge was cooked by my mom in magic Malta, I need to post a fantastic fish recipe.  I have made this recipe countless times and it never fails. This recipe is dedicated to Marijka, who has been begging me for this recipe for ages!  I'm sorry it has taken so long to get this to you.  I hope its as delicious as the first time I made it for you.


My first "official" cook book was this one: fast, fresh, simple. by Donna Hay, given to me by aunt Helen.  This woman is my food icon - I love her!  The fact that my aunt loved her too is even more reason I cook so many of her dishes.  


As you have probably guessed, this is a Donna Hay recipe that I have adapted for fish instead of chicken. 

Enjoy!

Ingredients: (Serves 4)

4 portions of white fleshy fish (sea bass is brilliant)
1 cup Jasmine rice
2 cups of chicken/fish stock
3/4 garlic cloves, finely chopped
A good stick of fresh Ginger, roughtly sliced
5/6 spring onion sprigs, sliced longitudinally
1 yellow pepper, roughly sliced
Handful of coriander
Salt and pepper
1 tsp Chilli flakes (optional)

Instructions:

Add some olive oil to a large pan or pot with a lid.  
Fry until slightly golden the garlic, ginger, spring onion, pepper and chilli flakes (optional).  
Turn the heat down to a simmer.
Add the dry rice to the pan and swoosh around to combine with the ingredients.  Spread the rice evenly across the pan.
Add the stock slowly so not to disturb the rice.
Cover and let simmer for 8-10 minutes.
Remove the lid and gently place the fish portions on top of the rice. Crack some salt and pepper over the fish.
Cover and cook for 8-10 minutes.
Scoop the fish portions out with a big spoon, making sure you get the rice underneath.  Plate up with a sprinkling of coriander to finish.

Tip: Check the fish every now and then to make sure you don't over cook it or check there is still a bit of moisture in the pan.  If it looks a bit dry and your fish is not cooked yet, just add a wee bit more water.


Tuesday, 2 July 2013

Pan-Fried Seabass in Lemon Sauce


Week 2 of the July recipe challenge: Fish


Fish is probably the most understated and unliked of all the 'meat'.  People are either too nervous to try fish, they don't know how to cook it, they don't like the fishy taste or its too bland, they don't like bones, or the most common one they don't like the smell (sometimes I admit its pretty disgusting - when its raw).

My parents have a lovely apartment in Malta over looking a small bay (I know I'm jealous too).  When this recipe challenge came up I told my mom about it and within 1 day she had already asked if she can cook the fish.  Being in Malta the fish is INCREDIBLE.  Fresh fresh fresh!  So I had no choice but to relinquish the fish challenge to my mom because it's honestly the best place to be cooking fish.

Note: I will post another fish recipe later this week.  The recipe is one that I love and is sooooo simple!  
Marijka, your senses should be tingling as you may be getting a surprise this week :)

Back to the recipe challenge.  In the words of my co-chef and food inspiration, Mom.

"Ok firstly we bought FRESH sea bass so that is of course key... However the sauce was extremely light and fragrant (lemon) that this could definitely enhance any fresh fish.
I seasoned the fish with my trusty fish spice [this fish spice is a Maltese spice, but apparently the Woolies fish spice is fantastic as well] and then simply fried it for a very few minutes on each side, skin side down first to sealed in flavour!  I heated the sauce in small pot and put the sauce over the fish, added capers and parsley before serving with salad.

That is it !!!"

Mom standing on the apartment balcony


This is my Mom in the Malta apartment... living the dream! And eating all the fish.  Thanks for all your inspiration and nudging in the kitchen when I was young.  If it wasn't for you I would not be so passionate and excited about cooking.

Mom walking the Ta'Xbiex Waterfront

Ingredients: (Serves 4)

Lemon-cream sauce
1 cup cream
juice and zest of 2 lemons
2 garlic cloves, minced
salt & pepper to taste
Fish
4 fish fillets (I used fresh hake)
¾ cup flour
1 teaspoon salt
2 teaspoons seasoning spice of your choice (I used a fish spice)
To serve
capers
parsely

Instructions:

To make the sauce, combine all the ingredients in a small saucepan and allow to simmer for 10 minutes until reduced slightly.
For the fish, combine the flour, salt & seasoning spice and coat the fish fillets thoroughly.
Fry the fish in a hot pan (in a little vegetable oil, skin-side down first) until golden brown then carefully flip over and fry for another 4-5 minutes until the fish is cooked through and golden brown.

Recipe from Simply Delicious Blog